Hyundai Santa Cruz: Brake System / Brake Bleeding Procedures

– Main worker : Bleeds the system by manually opening and closing the bleed screw and detecting air coming out of brake lines.
– Assistant : Brake pedal operation and scanner operation inside the vehicle.
1.Connect the brake fluid filler to the reservoir tank.

• Do not reuse the drained fluid.
• Always use genuine DOT4 brake Fluid.Using a non-genuine DOT4 brake fluid can cause corrosion and decrease the life of the system.
• Make sure no dirt or other foreign matter is allowed to contaminate the brake fluid.
• Do not spill brake fluid on the vehicle, it may damage the paint; if brake fluid does contact the paint, wash it off immediately with water.
• The reservoir on the master cylinder must be at the MAX (upper) level mark at the start of bleeding procedure and checked after bleeding each brake caliper. Add fluid as required.
2.Remove the wheel and tire.(Refer to Suspension System - "Wheel")
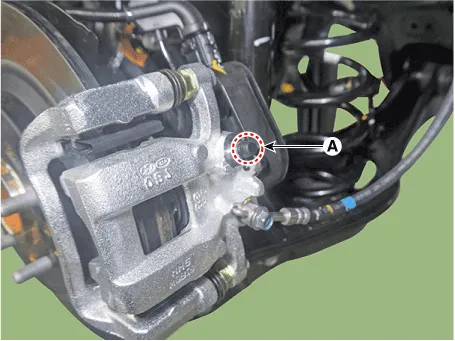
3.The main worker connects the clear hose to the wheel bleeder screw (A) and sends a signal to assistant to depress the brake pedal.
4.The assistant ro pump the brake pedal 2 times with normal brake force and then keep the brake pedal depressed.
5.While the assistant is depressing the brake pedal, remove the bleed screw (A) momentarily to remove the air, and then fasten it again.

• The bleed screw opens and closes only a quarter of a turn.
Tightening torque :13.7 - 19.6 N.m (1.4 - 2.0 kgf.m, 10.1 - 14.5 lb-ft)

Tightening torque :13.7 - 19.6 N.m (1.4 - 2.0 kgf.m, 10.1 - 14.5 lb-ft)
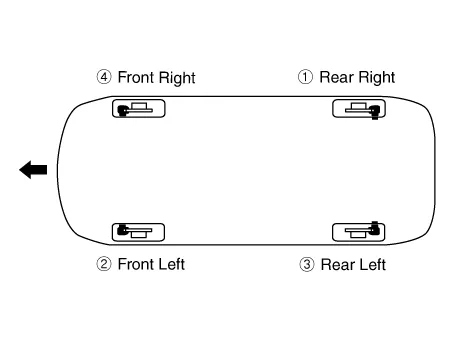
6.Repeat the procedure for wheel in the sequence shown below until air bubbles no longer appear in the fluid.
1.Connect the brake fluid filler to the reservoir tank.

• Do not reuse the drained fluid.
• Always use genuine DOT4 brake Fluid.Using a non-genuine DOT4 brake fluid can cause corrosion and decrease the life of the system.
• Make sure no dirt or other foreign matter is allowed to contaminate the brake fluid.
• Do not spill brake fluid on the vehicle, it may damage the paint; if brake fluid does contact the paint, wash it off immediately with water.
• The reservoir on the master cylinder must be at the MAX (upper) level mark at the start of bleeding procedure and checked after bleeding each brake caliper. Add fluid as required.
2.Connect the self-diagnosis to the data link connector located underneath the dash panel.
3.Connect a clear plastic tube to the wheel cylinder bleeder plug and insert the other end of the tube into a half filled clear plastic bottle.
4.Connect the self-diagnosis S to the data link connector located underneath the dash panel.
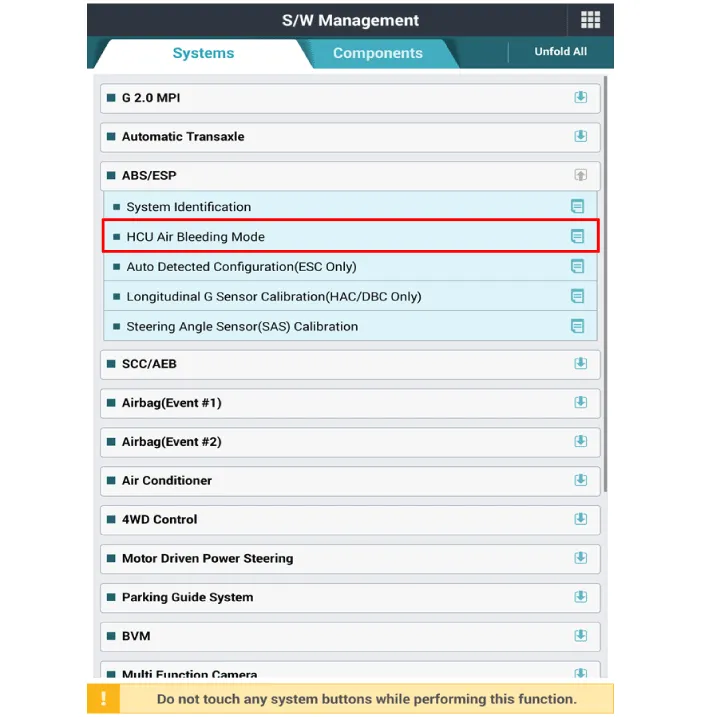
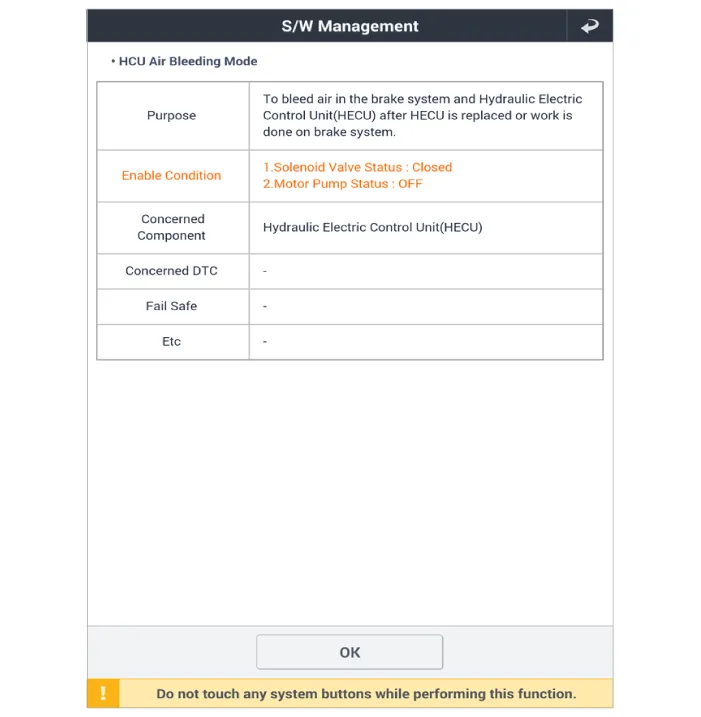
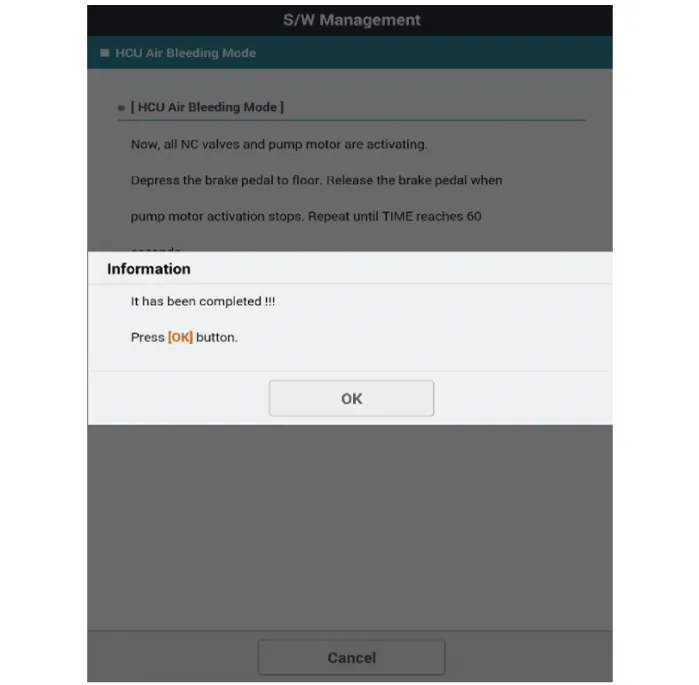
5.Select the "HCU Air Bleeding Mode".
6.When HCU is operated forcibly, keep the wheel bleeder screw (A) with opened state.
Tightening torque :13.7 - 19.6 N.m (1.4 - 2.0 kgf.m, 10.1 - 14.5 lb-ft)

Tightening torque :13.7 - 19.6 N.m (1.4 - 2.0 kgf.m, 10.1 - 14.5 lb-ft)


• The bleed screw opens and closes only a quarter of a turn.
7.Depress the brake pedal with strong force at regular intervals while HCU is operated forcibly.
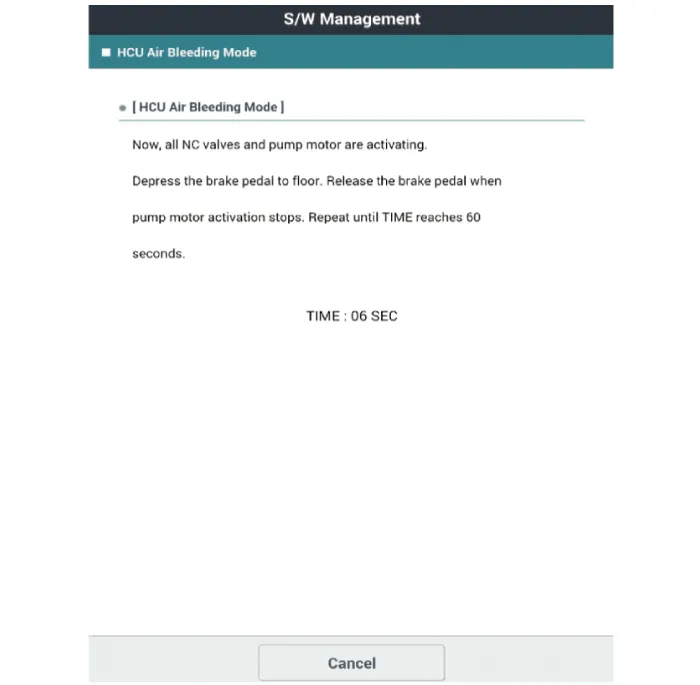
8.Repeat the above procedure until the air bubbles are completely removed.
9.When HCU forced operation is completed, send the "work end" signal.
10.Close the wheel bleeder screw.
11.Work in the order shown in the figure below.
12.Refill the master cylinder reservoir to MAX (upper) level line.
 Special Service Tools
- Special Service Tools
Tool (Number and Name)IllustrationUse
09581-11000Piston expander
Spreading the front disc brake piston
09527 - 2W110Sensor cap installer
Used for installing wheel speed s ...
 Brake System
...
Other information:
Hyundai Santa Cruz (NX4A OB) 2021-2025 Service Manual: Heater & A/C Control Unit (DATC)
- Terminal Function
Connector Pin Function
Pin NoConnector A
1Battery (+)
2-
3-
4LIN BUS (Climate control)
5-
6-
7-
8-
9IGN2
10ISG B+
11IGN1
12-
13Incar sensor (+)
14-
15Sensor Ground
16Ground
- Self Diagnosis
1.Self-diagnosis process.
• When op ...
Hyundai Santa Cruz 2021-2025 Owners Manual: Exterior Features
Roof Rack
Your vehicle may come equipped with
roof rack rails. If your vehicle is equipped
with roof rack rails, you may be able to
add roof rack crossbars as an accessory
(not shown).
NOTICE
If the vehicle is equipped with a
sunroof, be sure not to position cargo
onto the roof side rails in ...
