Hyundai Santa Cruz: Front Suspension System / Front Lower Arm G Bushing

• Replace the lower arm G bushing if it only has a crack, noise from bushing without cracks can be improved by applying silicone oil.
1.Replace the lower arm G bushing by using the SST (09545-AL100).
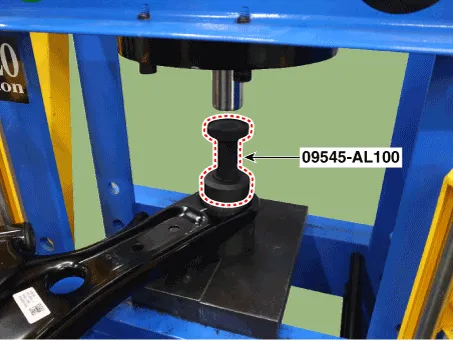
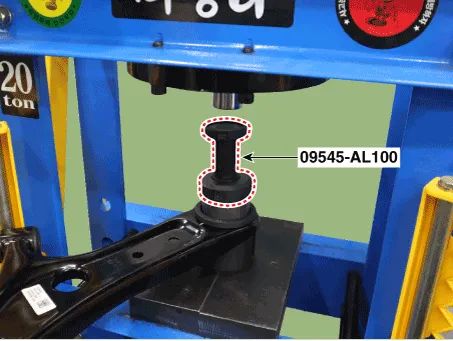

• Refer to the enclosed manual for detailed usage instructions of the lower arm G bushing SST(09545-AL100).

• Wear personal protective equipment during press operation.
• When the press is in operation, ensure that no part of the body comes into contact within the operating range.
• Due to the risk of injury from falling tools and parts, before operating the press, ensure that all tools and components are securely positioned in their proper places.

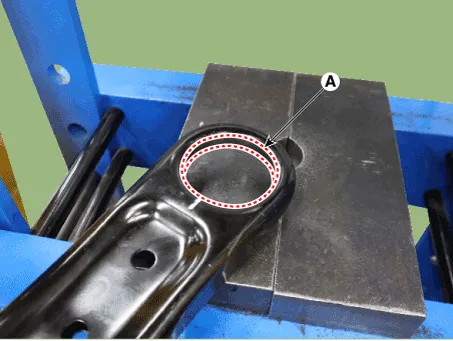
• Lubricate the bushings and mounting surface with grease during the operation.
• Measure the void spacing (A), (B) to ensure that the bushing can be properly installed in the correct direction.
(A) : Ball joint side(B) : Opposite side
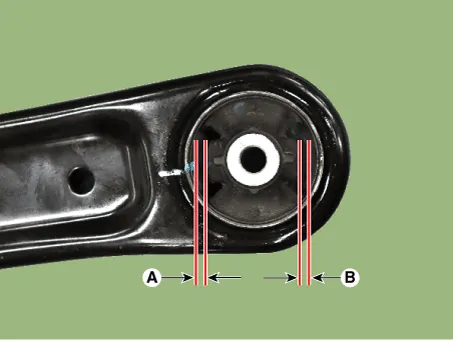
• Be careful not to install the bushing at the incorrect angle.
Installation angle (A) : Angle formed counterclockwise from A bushing (B) and G bushing (C) reference
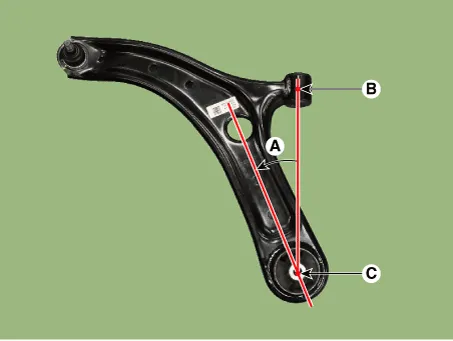
• Clean the bushing mounting surface (A) from any foreign substances using a clean cloth or similar material when installing.
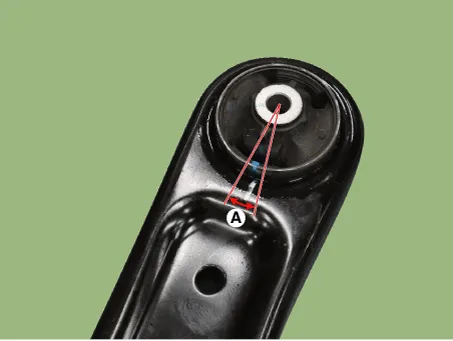
• Ensure that the marking angle (A) of the bushing and the lower arm does not deviate from the reference value.
Reference Value : ± 3°
• If excessive pressure is applied after installation is complete, it may result in damage to the components and tools.
 Front Lower Arm
- Removal
• When lifting a vehicle using a lift, be careful not to damage
the lower parts of the vehicle (floor under cover, fuel filter, fuel
tank, canister).(Refer to Ge ...
 Front Stabilizer Bar
- Removal
• When lifting a vehicle using a lift, be careful not to damage
the lower parts of the vehicle (floor under cover, fuel filter, fuel
tank, canister).(Refer to Ge ...
Other information:
Hyundai Santa Cruz 2021-2025 Owners Manual: Changing Tires
WARNING
A vehicle can slip or roll off of a jack
causing serious injury or death to you or
those nearby. Take the following safety
precautions:
Do not get under a vehicle that is
supported by a jack.
NEVER attempt to change a tire in
the lane of traffic. ALWAYS move the
vehicle completel ...
Hyundai Santa Cruz 2021-2025 Owners Manual: Manual Speed Limit Assist
Operation
To set speed limit
1. Press and hold Driving Assist
() button at the desired speed. The
Manual Speed Limit Assist enabled
() indicator will illuminate on
the cluster.
2. Push the + switch up or - switch down,
and release it at the desired speed.
Push the + switch up or - switch down
and hold ...
