Hyundai Santa Cruz: Brake System / Repair procedures
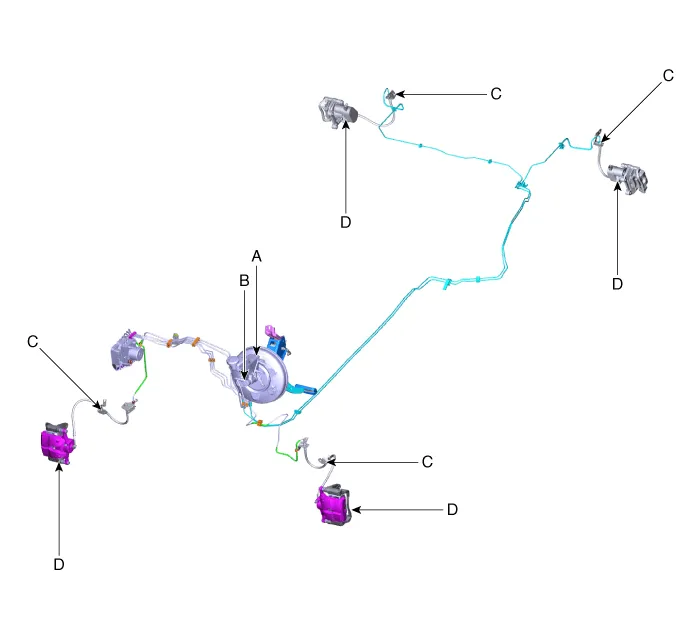
1.Brake Booster (A)
(1)Check brake operation by applying the brake during the test run. If the brake does not operate properly, replace the brake booster. If brake fluid remains inside the booster when disassembled, replace the booster and master cylinder.
2.Piston cup and pressure cup inspection (B)
(1)Check brake operation by applying the brakes. Look for damage or signs of fluid leakage. Replace the master cylinder as an assembly if the pedal does not work properly or if there is damage or signs of fluid leakage.
(2)Look for damage or signs of fluid leakage.
(3)Replace the master cylinder if it does not work properly or if it is damaged or leaking. If brake fluid remains inside the booster, replace the booster at the same time.
(4)Check for a difference in brake pedal stroke between quick and slow brake applications.
(5)Replace the master cylinder if there is a difference in pedal stroke.
3.Brake hoses (C)
(1)Look for damage or signs of fluid leakage.
(2)If there is damage or leakage, replace the brake hose and washer with new ones.
4.Caliper piston seal and piston boots (D)
(1)Check brake operation by applying the brakes.
(2)Look for damage or signs of fluid leakage. If the pedal does not work properly, the brakes drag, or there is damage or signs of fluid leakage, disassemble and inspect the brake caliper. Replace the boots and seals with new ones whenever the brake caliper is disassembled.
 Brake System
...
 Brake Booster
- Components
1. Reservoir cap2. Reservoir3. Brake booster4. Master cylinder5. Push rod
- Brake Booster Operating Test
1.Run the engine for one or two minutes, and then stop it. If the
...
Other information:
Hyundai Santa Cruz 2021-2025 Owners Manual: All Wheel Drive (AWD)
The All Wheel Drive (AWD) System
delivers engine power to both the front
and rear wheels for maximum traction.
AWD is useful when extra traction is
required on roads such slippery, muddy,
wet, or snow-covered roads.
Occasional off-road use such as
established unpaved roads and trails are
OK. ...
Hyundai Santa Cruz (NX4A OB) 2021-2025 Service Manual: Main Crash Pad Assembly
- Component Location
1. Main crash pad assembly
- Replacement
• When removing with a flat-tip screwdriver or remover, wrap protective tape around the tools to prevent damage to components.
• Put on gloves to prevent hand injuries.
• T ...
