Hyundai Santa Cruz: Lubrication System / Oil Pan
1.Remove the engine room under cover.(Refer to the Engine And Transaxle Assembly - "Engine Room Under Cover")
2.Drain the engine oil.(Refer to the Lubrication System - "Engine Oil")
3.Loosen the A/C compressor mounting bolts.(Refer to the Heating, Ventilation and Air Conditioning - "Compressor")
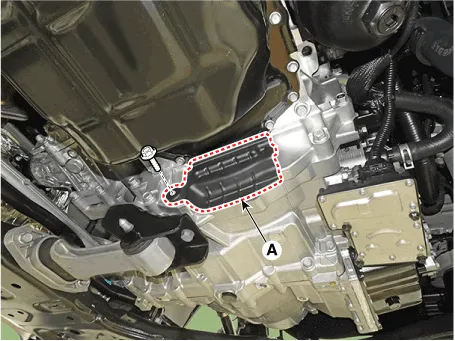
4.Remove the dust cover (A).
Tightening torque :42.2 - 48.1 N.m (4.3 - 4.9 kgf.m, 31.1 - 35.4 lb-ft)
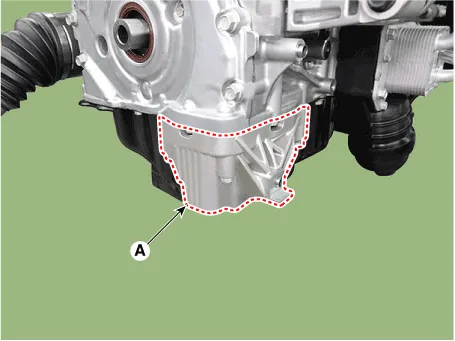
5.Remove the A/C compressor mounting bracket (A).
Tightening torque :19.6 - 23.5 N.m (2.0 - 2.4 kgf.m, 14.5 - 17.4 lb-ft)
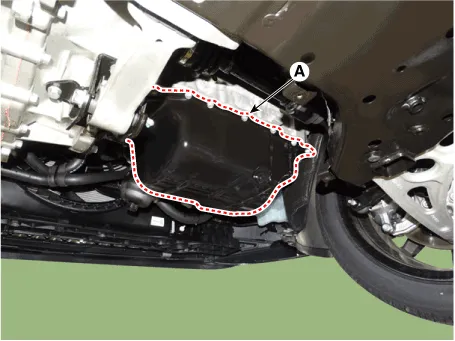
6.Remove the oil pan (A).
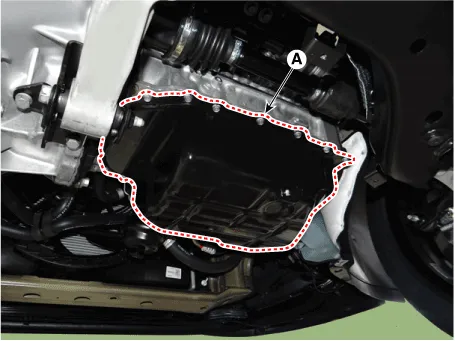

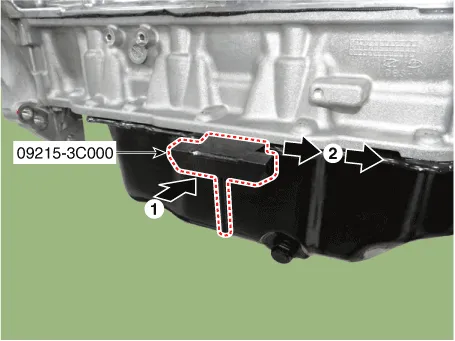
• When removing the oil pan, be careful not to damage the mating surface between the lower crankcase and oil pan using the SST (09215-3C000).

• Insert the SST between the oil pan and the lower crankcase by tapping it with a plastic hammer in the direction of the arrow ①.
• After tapping the SST with a plastic hammer along the direction of arrow ② around more than 2/3 edge of the oil pan, remove the oil pan from the lower crankcase.
• Never use the SST such as a prybar with inserted between the oil pan and the lower crankcase. Otherwise, it may damage the blade of SST.
1.Install the oil pan.
(1)Before assembling the oil pan, remove the hardening sealant, foreign material, oil, dust, moisture remaining on the sealing surface and on the mating part.
(2)Assemble the oil pan within 5 minutes after applying sealant.
Bead width : 3.5 - 4.5 mm (0.13780 - 0.17717 in.)Sealant : MS 721-40 AA or AA0
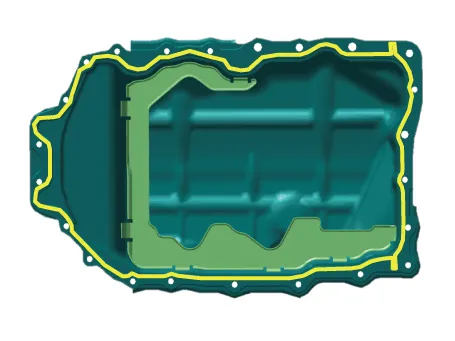

• When applying sealant gasket, sealant must not be protruded into the inside of oil pan.
• To prevent leakage of oil, apply sealant gasket to the inner threads of the bolt holes.
• When applying sealant gasket on the lower crankcase, the sealant application line should be same with that of the oil pan.
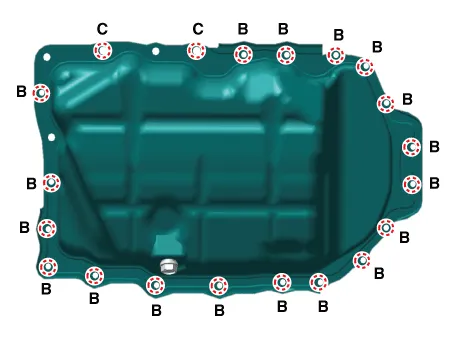
2.Assemble the oil pan (A) and then uniformly tighten the oil pan bolts in several passes.
Tightening torque :Bolt (B) : 9.8 - 11.8 N.m (1.0 - 1.2 kgf.m, 7.2 - 8.7 lb-ft)Bolt (C) : 29.4 - 33.3 N.m (3.0 - 3.4 kgf.m, 21.7 - 24.6 lb-ft)

• After assembling the oil pan, fill engine oil after at least 30 minutes have elapsed.
3.Install in the reverse order of removal.
4.Fill the engine oil.(Refer to the Lubrication System - "Engine Oil")
5.Install the engine room under cover.(Refer to the Engine And Transaxle Assembly - "Engine Room Under Cover")
 Oil Filter & Oil Cooler
- Removal and Installation
1.Drain the engine coolant. (Refer to the Cooling System - "Coolant")
2.Drain the engine oil.(Refer to the Lubrication System - "Engine Oil")
3.Disconnect the oil coo ...
 Oil Pump
- Removal
Balance shaft assembly and oil pump chain
1.Remove the timing chain.(Refer to the Timing System - "Timing Chain")
2.Compress the balance shaft chain tensioner and then assemble the fix ...
Other information:
Hyundai Santa Cruz 2021-2025 Owners Manual: How Vehicle Radio Works
FM reception
AM and FM radio signals are broadcast
from transmitter towers located around
your city. They are intercepted by the
radio antenna on your vehicle. This signal
is then received by the radio and sent to
your vehicle speakers.
When a strong radio signal has reached
your vehicle, the ...
Hyundai Santa Cruz (NX4A OB) 2021-2025 Service Manual: Seat Heater (Air Ventilation)
- Components
1. Seat cushion heater (Ventilation)2. Seat heater (Ventilation) unit 3. Seat back heater(Ventilation)
- Circuit Diagram
PinConnector AConnector B
1IGN 1Ventilation heater battery (+)
2Blower power_LHHeater power_LH
3Blower speed_LHHeater power_RH
4Blower RPM input_L ...
