Hyundai Santa Cruz: Ignition System / Spark Plug
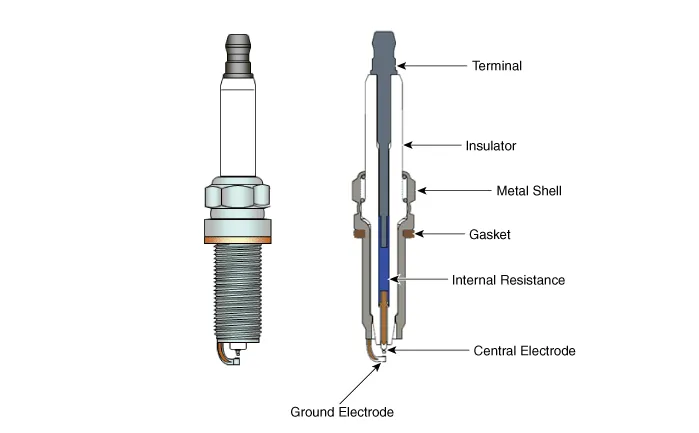
| Item | Specification |
| Type | SILZKR8J9GS |
| Gap | 0.8 - 0.9 mm (0.0315 - 0.0354in.) |
| Electrode Material | IRIDIUM |
1.Accelerate the engine to about 3,000 rpm 3 times or more.
2.Remove the spark plug.(Refer to Spark Plug - "Removal")
3.Check the spark plug visually.If the electrode is dry, the spark plug is normal.If the electrode is wet, check for damage and inspect the electrode gap as follows.
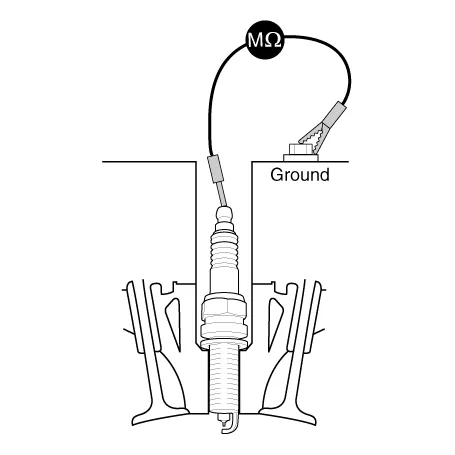
1.Check the spark plug for any damage on its thread and insulator.If there is damage, replace the spark plug.
2.Check the electrode. Measure the insulation resistance with an ohmmeter.If the resistance is less than the specified value, adjust the electrode gap.
Specification : 10 MΩ or more
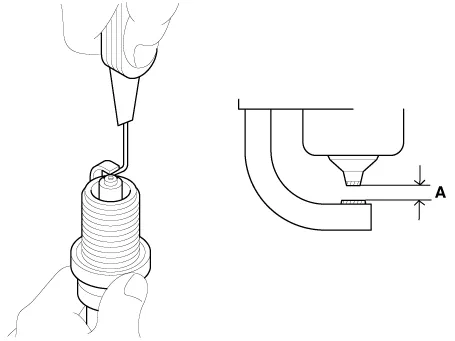
3.Check the spark plug electrode gap.If the gap is greater than the maximum, replace the spark plug.
Specification : 0.8 - 0.9 mm (0.0315 - 0.0354in.)

• When adjusting the gap of a new spark plug, bend only the base of the ground electrode. Do not touch the tip.Never attempt to adjust the gap on a used plug.
1.Prepare the soft cloth.
2.Wipe the contaminants of the spark plug insulator with the soft cloth as shown in the following figure.
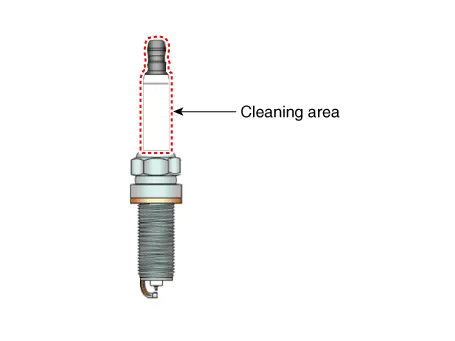

• The cloth should be clean, free of contaminants, and soft enough to not damage the parts.
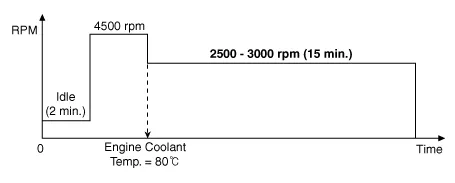
1.Start the engine and keep the engine running at idle for 2 minutes.
2.Step on the accelerator pedal and hold it steady at 4500 rpm with the shift lever in N position to warm up the engine until the temperature of the engine coolant reaches 80℃.
3.Keep the engine running at 2500 - 3000 rpm in the N position for 15 minutes.

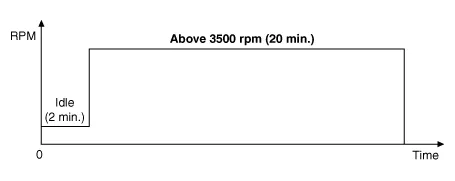
• The 2nd method should be performed only if the 1st method fails (the misfire-related codes recur).
1.Start the engine and keep the engine running at idle for 2 minutes.
2.Drive the vehicle for over 20 minutes, keeping the engine speed above 3500 rpm.

• If equipped with manual transaxle, shift the gear properly for keeping the engine speed above 3500 rpm.
1.Remove the ignition coil.(Refer to Ignition System - "Ignition Coil")
2.Using a spark plug wrench, remove the spark plugs (A).
Tightening torque : 14.7 - 24.5 N.m (1.5 - 2.5 kgf.m, 10.8 - 18.1 Ib-ft)
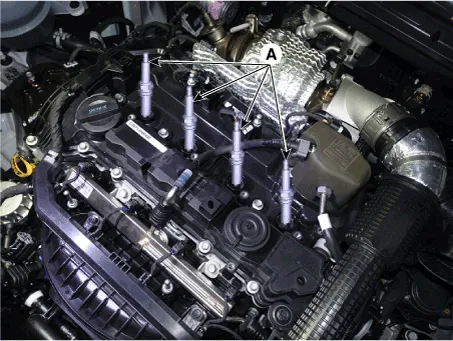

• Be careful that no contaminates enter into spark plug holes.
1.Install in the reverse order of removal.
 Ignition Coil
- Description
The ignition coil is mounted on the top side of the cylinder head cover
end. The ignition coil consists of the primary coil that receives
battery power and the secondary coil that ...

Other information:
Hyundai Santa Cruz (NX4A OB) 2021-2025 Service Manual: Hood Weatherstrip
- Replacement
• Be careful not to scratch the hood weatherstrip.
1.Remove the hood weatherstrip (A).
2.To install, reverse removal procedure.
• Replace any damaged clips (or pin-type retainers).
...
Hyundai Santa Cruz (NX4A OB) 2021-2025 Service Manual: Identification Numbers
- Identification Number
Identification Number Description
Vehicle Identification Number
1.World Manufacturer Identifier (WMI)- 5NT : Freight
2.Vehicle line- J : NX4AT
3.Model & Series- A : Low grade (L)- B : Middle-Low grade (GL) - C : Middle grade (GLS, JSL, TAX) - D : Middle-H ...
